How to Install Iron Balusters
The most common stair remodel is the process of removing old wooden balusters and replacing them with new wrought iron balusters. This process usually takes 1 to 2 days and can be performed by most anybody that has a bit of D.I.Y. experience. Our brief step by step guide will take you through the basic process of your wood to iron baluster swap.
Tools Required:
- Drop Cloth
- Reciprocating Saw (or jig saw)
- Pliers
- Drill & Drill Bits
- Tape Measure
- Portaband Saw (or chop saw with metal cutting blade)
Products Required:
- Balusters
- Base Shoes (If you plan to use them, most people do)
- Epoxy Gun & Epoxy (non-drip, clear dry preferred)
Step 1 – Preparing the work area.
Cutting out the wood balusters can be messy. We recommend using a drop cloth to cover any furniture and decor you don’t want covered with sawdust. It’s also a good idea to cover any walking area with drop cloth aswell to prevent damaging your floor.

Step 2 – Cutting Old Balusters
Using the Reciprocating Saw or Jig Saw, cut the wood balusters in half. Cutting at a slight angle will help with step 3.
Step 3 – Remove Old Balusters
After you have cut the wood balusters in half, slowly push / wiggle them back and forth until the nails are worked loose. Remove the leftover nails with the pliers.
** Note – If your old wooden balusters did not use nails, but used a Dowel Pin and Wood Glue, there is a possibility that you could break off part of the tread / floor and/or handrail along with the baluster. Some installers will cut the wood balusters off at the top and bottom and then sand it smooth. Others will replace the handrail and tread if irreparable damage has occurred.
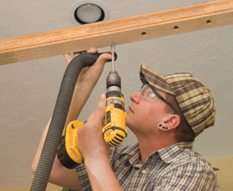
Step 4 – Drilling Holes
Some installs will have holes leftover from the old wooden balusters and some installs will be left with a flat surface.
Make sure the top holes in the bottom of the handrail are large enough for the baluster to fit. Make sure you drill at least 1 to 1.5 inch in the handrail.
For the bottom holes on the tread, it is best that these are only 1/4 to 1/2 inch deep.
If you are not using shoes, make sure your holes are drilled as tight as you can for round balusters. Using square balusters, punch out a square hole for best results.
The goal is to have enough room up top to slide the baluster in, and then drop it down into the bottom hole.
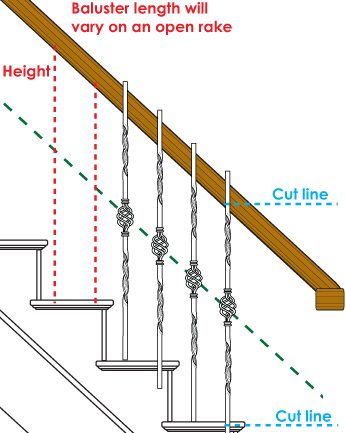
Step 5 – Cutting Iron Balusters to Size
Measure from the floor to the bottom of the handrail. Add 3/4″ onto that measurement and this is how long you should cut your iron baluster. This gives you enough room to slide the baluster up into the handrail and then drop it down into the tread and still have enough baluster to glue in place.
Using a Portaband saw or a chop saw with a metal cutting blades are the best methods to cut your wrought iron balusters.
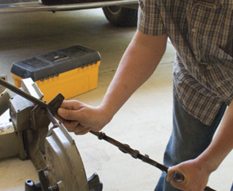
Most balusters can be cut from only the bottom and installed fine, however if you want your pattern to line up at a specific height it is best to cut from top and bottom.
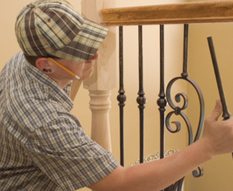
Step 6 – Insert Iron Balusters
First, slide your baluster shoe onto the baluster. Slide the baluster into the top handrail first, and then drop it down into the hole in the floor / tread. We purposely drilled out a deeper hole in top to give us this extra room.
Make sure everything lines up and the pattern is correct before adding glue.
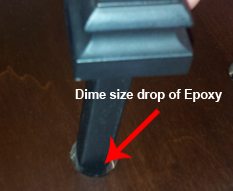
Step 7 – Epoxy & Base Shoes
Now is the time to add epoxy. We recommend a dime size drop of epoxy top and bottom. This drop goes into the top and bottom hole.
If you are also using baluster shoes, slide the shoe down and apply a little epoxy where the shoe will sit on the floor or where it will rest on the baluster. You could also use the shoe set screw but either way we always recommend using epoxy on the shoe.
Allow a full 24 hours to dry and cure.